If you’re in the market for the best “bang for the buck” video camera, your search stops here! Why? Because the best video camera on the market is already in your pocket. That is … if you know the best iPhone camera settings for professional video.
iPhones today are packed with features and capabilities that — even just a few years ago — were unheard of in such a small form factor. With HDR video, multiple lenses, 4K recording, and seriously impressive processing features, there’s not much reason to invest in a high-end video camera anymore.
However, with so many features at your disposal, there are also a lot of settings to consider. We’re here to help! So let’s open the Camera app and run through the best iPhone camera settings for video in 2024.
1. Resolution settings
Your resolution settings refer to how crisp your image is. Typically resolution is measured by how many pixels are displayed on the screen. There are more terms and nuances surrounding resolution than we can get into, but here’s a quick rundown: Standard definition is around 480p, while HD starts at 720p. 1080p is considered Full HD, and 4K is considered Ultra HD.
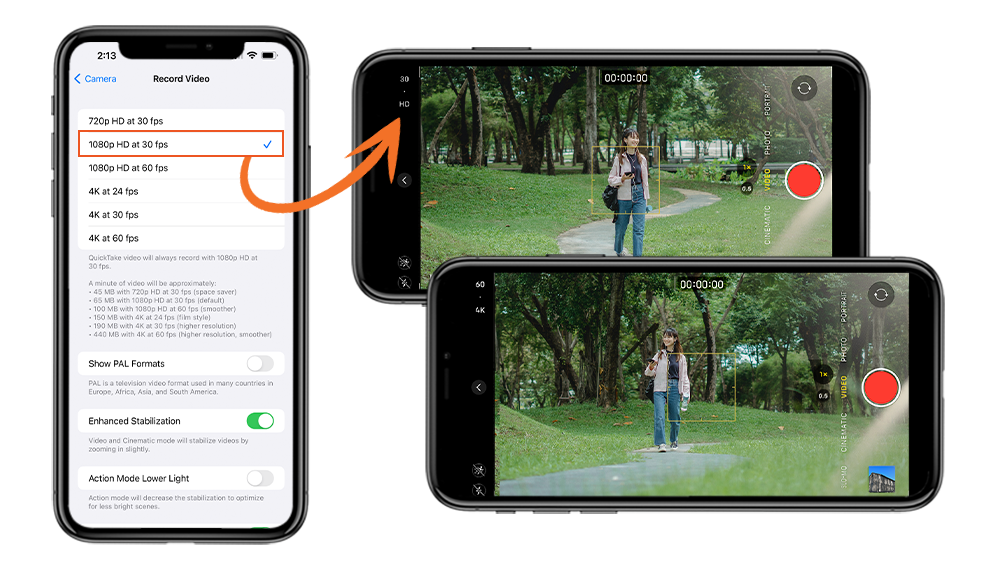
Since the iPhone 6S was released in 2015, every iPhone all the way up to the brand new iPhone 14 pro max has been able to record super crisp 4K video. 4K video means a lot of pixels, offering you the flexibility to crop and reframe footage if you’re editing in post-production. Unfortunately, 4K video also means a lot of data to store (150-440MB per minute depending on your framerate).
The good news is that most of your viewers aren’t going to notice the difference between 4K and 1080p footage. Think of 4K as a tool that can help you in the editing process. So, instead of shooting 4K for every shot, only use it when you want to capture as much detail as possible, or when you plan to drastically crop your shot for close-ups.
Enabling 4K video on your iPhone is easy: Open the Camera app, switch the camera mode to Video, and look to the corner of your screen. If you’re shooting in 1080p, you’ll see an HD label. Just tap HD to switch to 4K video.
For best image quality:
Shoot 4K at 24 FPS (we’ll get into FPS next). It’s the highest resolution available on iPhones and you’ll get lots of detail in the image.
For faster workflow:
Shoot HD most of the time for high-quality video that saves on storage. Then, bump it up to 4K if you plan to do heavy editing later.
2. Frame rate settings
Your frame rate (also called frames per second or FPS) refers to how many images are displayed in each second of a video. Your frame rate settings can change the look of your video, though not necessarily the quality. 24 FPS is the film industry standard for frame rate and is typically used in movies. 30 FPS is what you probably see most often: It’s the default setting for lots of devices and cameras, and it creates a natural motion blur. 60 FPS offers a super crisp experience for viewers (but it can look a bit unnatural).
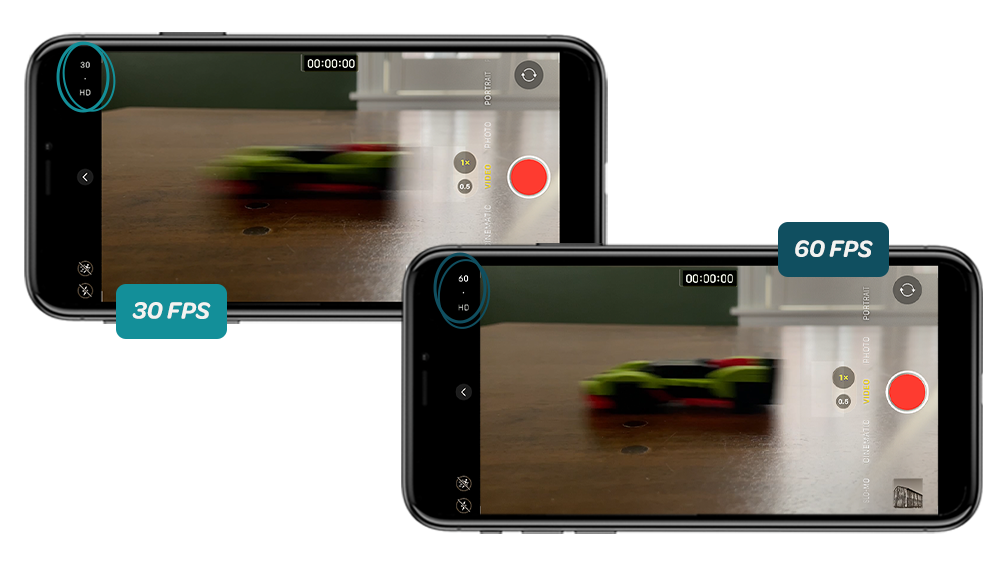
You can quickly and easily change your frame rate settings in the Camera app. When you’re in video mode, just tap the number displayed next to the resolution. Depending on your phone and version of the Camera app, there will be different options for FPS. On my phone, I can choose between 30 and 60 FPS if I’m shooting in HD. If I’m shooting in 4K, I can also choose 24 FPS.
iPhones also let you shoot HD slow motion in either 120 or 240 FPS. Just keep in mind that you’ll see a significant drop in video quality so I recommend only using this mode to shoot some eye-catching b-roll.
For best image quality:
Shoot in 4K at 24 FPS. Your video will have a cinematic look viewers love with better low-light performance.
For faster workflow:
Stick to 30 FPS for most of your video shooting. Go with 60 FPS (and up) if you’re capturing action or sports, and 24 FPS if you’re feeling ✨Hollywood.✨
3. Exposure settings
Simply put, exposure is how bright your video is. Photos or videos that are overexposed will look nearly white, and underexposed ones will be dark and shadowy. Both result in a loss of detail (not to mention an unappealing visual).
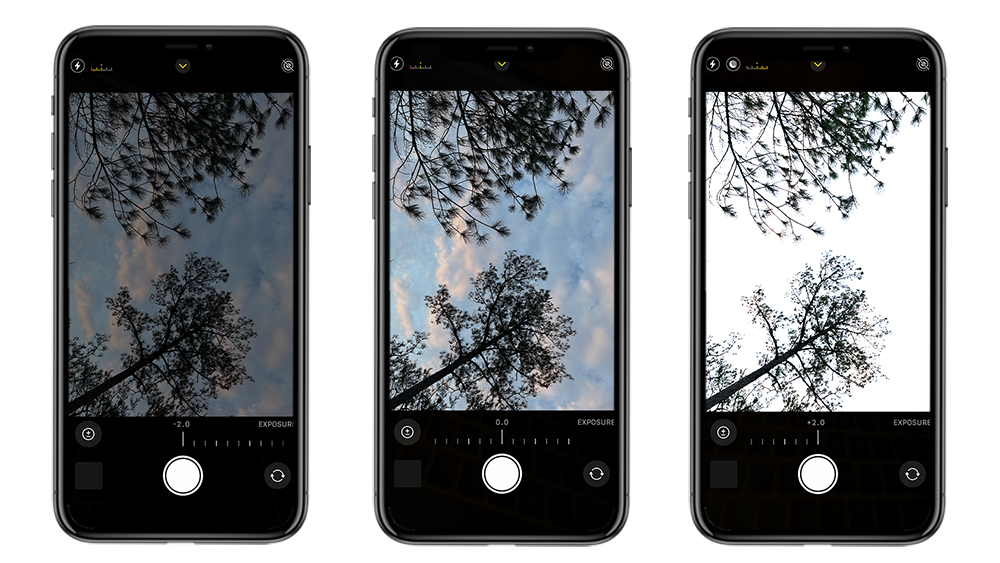
Exposure is simple to control in the iPhone’s native camera app, and there are two ways to do it. The first option is to tap your phone screen while you’re recording, right on the area you want to adjust, and the focal point will shift to that area. The app will adjust the entire image’s exposure to match that area. You’ll also notice a sun icon next to the yellow box, which you can pull up or down to fine-tune the automatic exposure.
The other option is to tap the arrow icon on the side of the frame. A dial will appear on your screen letting you adjust the automatic exposure sensitivity for the entire frame (aka exposure compensation). Exposure from +0.3 through +2 will brighten the image, and -0.3 through -2 will darken it. You’ll also get a helpful indicator at the side of the screen that lets you know if your shot is over- or underexposed.
Aside from these automatic exposure features, the native iPhone Camera app doesn’t offer many tools for adjusting this setting. That works for most people, but can be frustrating to deal with if the lighting conditions for your video keep changing — especially for advanced videographers who understand how ISO and shutter speed/angle affects an image. Luckily, there are supplementary camera apps that unlock the iPhone’s camera and introduce manual camera controls. One of these is Switcher Studio.
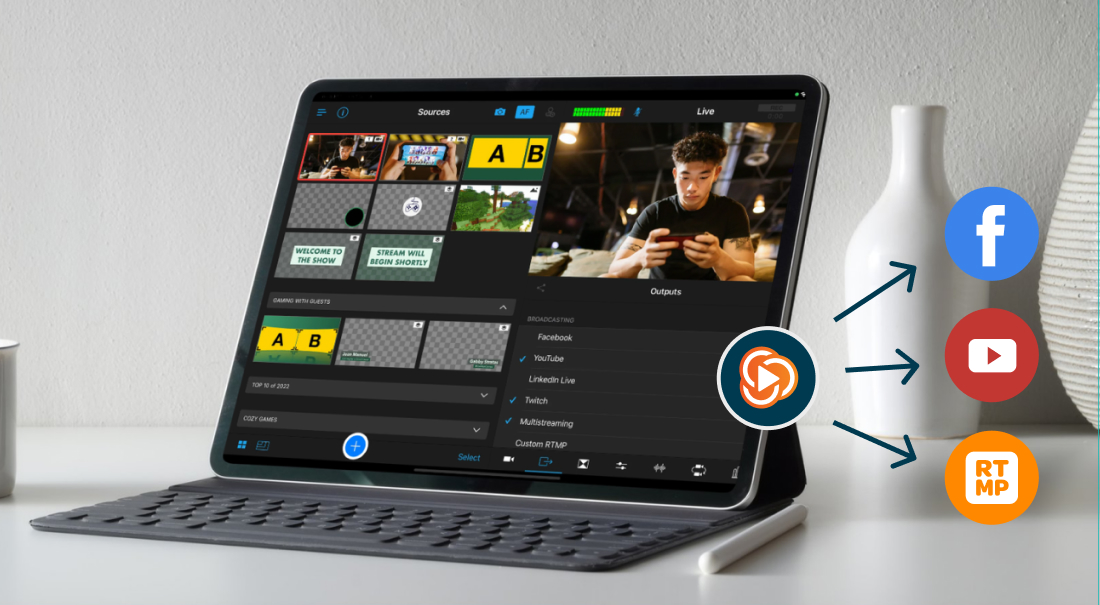
Switcher Studio is an iPhone camera app that lets you manually adjust and lock ISO and shutter speed (measured in milliseconds), and even lets you shoot in multiple bitrates (up to 96 Mbps), resolutions (720p, 1080p, 4K), and frame rates (23.98, 24, 25, 29.97, 30, 47.95, 48, 50, 59.94, 60). The settings are easy to use, easy to learn for beginners, and let you create the exact image you want — without fighting constant automatic adjustments.
For best image quality:
Download an app like Switcher Studio for precise control over your exposure. Leave the guesswork behind.
For faster workflow:
If you’re pressed for time and don’t care about image quality, use the iPhone’s native camera app and its auto exposure.
4. Color temperature
Color temperature is another important setting to keep in mind when shooting video because it determines whether your scene looks normal or unnaturally orange or blue.
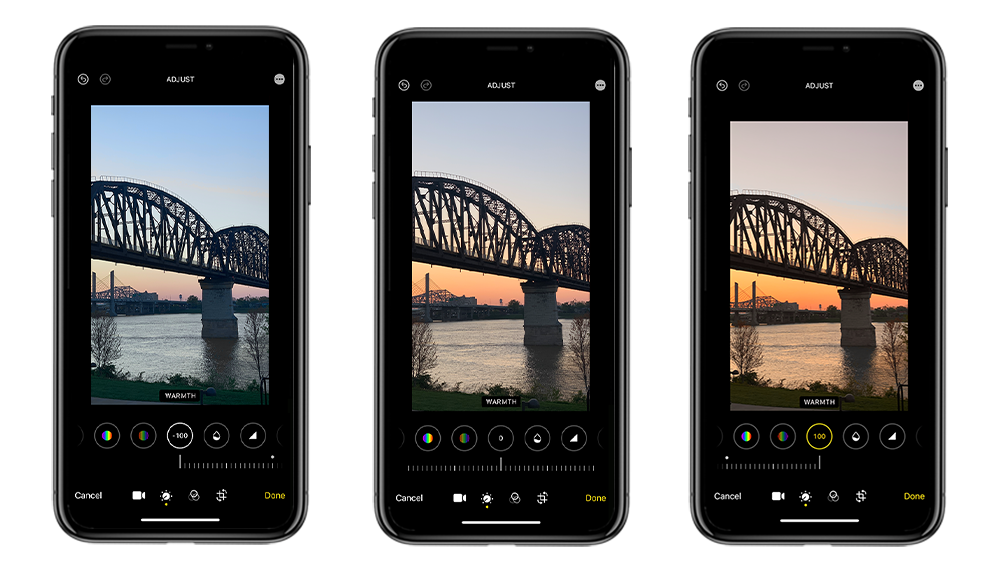
Every light source — natural light or studio light — has a color temperature, and the sun’s color temperature changes depending on the time of day and weather conditions. You can probably see for yourself whether light is cool or warm, but color temperature is measured in kelvins. Lower numbers are “warmer” while higher numbers are “cooler.” For example, 3200 K is warm and looks orange (think “golden hour” sunlight). 6500 K is cool and looks blue (think overcast daylight). Bright, midday sunshine is right around the middle, about 5600 K.
When shooting a video, you can control the color temperature by color balancing — typically done by adjusting the white balance. The white balance tool helps adjust all of the colors in a shot to match what your eyes see in person. With the right white balance, something that looks white in-person will also look white in your shot (as opposed to orange or blue), and the rest of the colors in the shot will be normalized too.
iPhones automatically set color temperature based on what it sees in the environment, and it’s usually quite good at it. However, this can also be a weakness: If your shot has multiple light sources with different color temperatures, the iPhone’s Camera app might constantly adjust the color temperature during your recording. For example, if you have a ceiling light and two lamps with different light bulbs in your shot, the look of your video could change repeatedly as the iPhone tries to determine the right color temperature.
Once again, the solution here is to use a camera app with manual camera controls. There are a number of them, including Switcher. Not only can you manually adjust color temperature (or use a gray card to set the exact white balance), but you can also adjust the image’s tint if it's looking too green or purple. You can also still automatically white balance your shot in Switcher Studio, and then you can lock that white balance so your video has the same natural look throughout your video.
For best image quality:
Use Switcher Studio to manually set or lock your white balance.
For faster workflow:
Shoot with the iPhone’s native Camera app and allow it to automatically adjust the white balance.
5. iPhone cameras and multicamera video
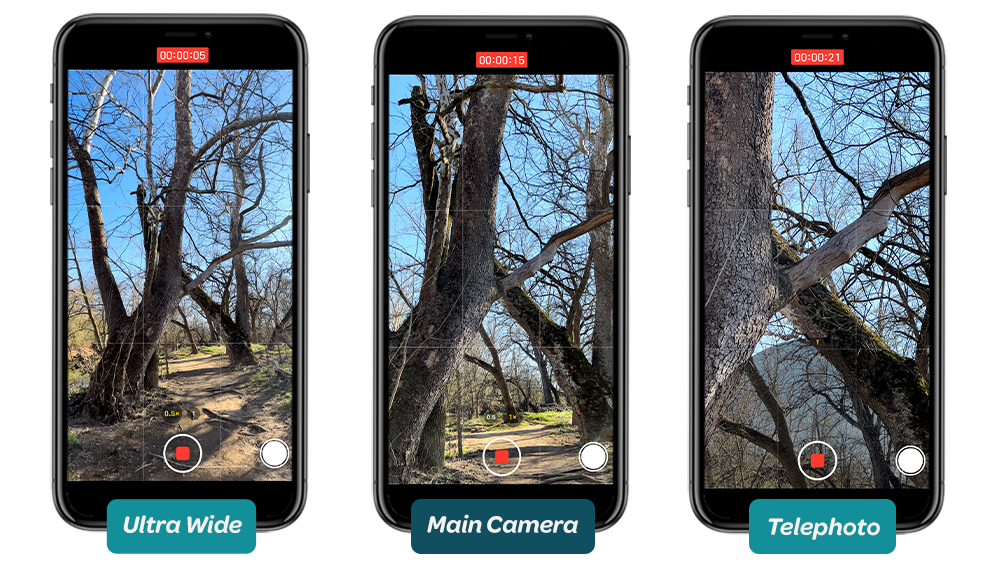
Most iPhones today have at least three cameras: your front camera, a standard 1x and an ultra-wide .5x camera. Certain models also come with a 2x or 3x telephoto camera. These advancements have opened the world of iPhone videography — and significantly lightened the camera bag of video professionals. Now you can have a quality multiple-lens toolkit in your pocket.
-
Main: The 1x camera is the classic focal length you know and love: It’s wide, but not too wide, and doesn’t warp faces or scenes. This camera is good for just about every kind of shooting.
-
Ultra Wide: The .5x ultra-wide lens is, well, really wide. In fact, it’s too wide for some subjects (like close-ups of faces) because it warps and stretches the image. However, it’s great for shooting low angles of buildings and grand interiors because it adds scope and scale to the image.
-
Telephoto: The 2x (or 3x depending on your iPhone model) telephoto lens goes in the opposite direction of the wide angle with it's digital zoom, and allows you to drastically zoom in on your shot. This camera is great for close-ups of people or objects because that compressed focal length adds depth and focus to the subject at hand. You also get a more shallow depth of field with this lens, which makes for those desirable blurred backgrounds you get with large sensors and wide apertures on DSLR and cinema cameras.
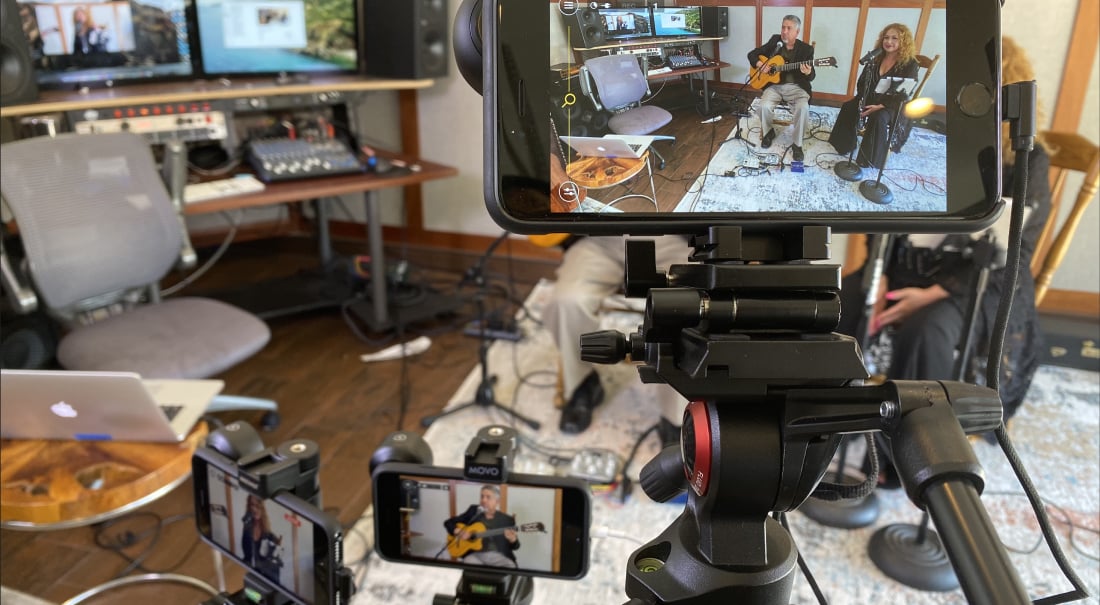
These are three great, versatile camera options on one device. The only drawback is that there’s no way to shoot true multicamera video in the native iPhone Camera app. However, it’s possible to connect multiple iPhones — and switch between them — with the Switcher Studio app! You can sync up to nine iOS devices to Switcher Studio, which means you have a new use for those older iPhone models you might have laying around.
You can have a main camera angle, a close-up shot, an overhead angle, a side shot — any other angles you can think of. Then, switch between angles or display multiple camera feeds on the screen simultaneously. Your completed production can be saved locally or on the cloud, plus, if you use Switcher Studio’s Director Mode, you can save the recording of each individual angle. Then just drop them into an editor like Adobe Premiere or Final Cut to stitch them together however you like.
For best image quality:
Use the 1x camera for most shots, and the .5x and 2-3x cameras for specialty shots. If you need multicam for iPhone videography, use Switcher Studio.
For faster workflow:
Stick to just switching between the different cameras in the iPhone camera app, but you won’t have as much flexibility later.
5. Processing features and other tools
There are a few extra features to explore in your iPhone camera. Some see these tools as gimmicks and others swear by them — I’ll let you decide.
HDR
HDR stands for High Dynamic Range. This feature does its best to equally expose shadows and highlights to retain lots of detail in the image. iPhone HDR video does this by taking multiple exposures at once and stitching them together in the final image.
Sometimes it can look incredible. Other times the image can look washed out, low-contrast, or oddly colored, especially for skin tones. Though it can be hit or miss, it’s worth testing to see if it suits your video needs.
To enable HDR on your iPhone, go to Settings, Camera, Record Video, then toggle on HDR video.
We recommend:
Do a test before you start recording. If HDR looks good for your shot, keep it on. If not, turn it off.
Cinematic Mode
The iPhone 13 and iPhone 13 Pro introduced Cinematic Mode, which uses depth data and processing to blur the background around a subject. This setting is intended to mimic true depth of field on a DSLR or cinema camera (similar to Portrait Mode when taking a photo).
Cinematic Mode can be used to great effect … or it can look embarrassingly fake. The best way to make Cinematic Mode look good is by reducing the effect so that the blur is very subtle. Do this by tapping the small f with a number next to it (the faux aperture setting). The higher you go, the less blurry the background. I think the sweet spot is around f5.6 to f8: You’ll get a nice subtle blur, and if the iPhone’s processing isn’t perfect around the edges of your subject, it won’t be too noticeable. The great thing is that you can go back and readjust later.
We Recommend:
Use Cinematic Mode for detail shots and when you want to separate your subject from its surroundings, but don’t go overboard.
Grid Lines
Good composition is essential in video. You want your subject framed properly, but it can be difficult to do this without some help. A good rule of thumb is the rule of thirds — a well-known composition guideline to help photographers and videographers frame their subjects. That’s where grid lines come in, adding two vertical lines and two horizontal lines to your screen while shooting. These equidistant lines create a grid to help you follow the rule of thirds.
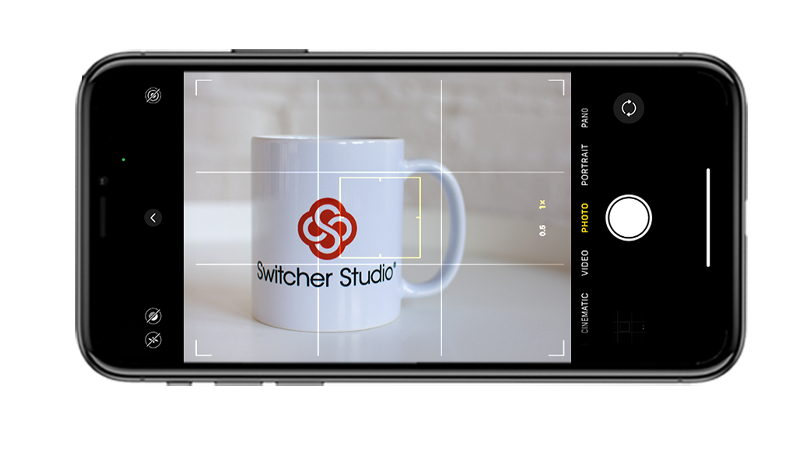
To access grid lines in the iPhone’s native camera app, open Settings, then Camera. Then, just “Grid” on or off as you like. Other video apps also have grid lines. Switcher Studio even offers an additional 4:3 overlay, which is great if you prefer that orientation over the usual 16:9, or if you want to ensure your subject will stay in-frame even if your video gets cropped. Switcher Studio’s grid lines are also accessible in your iPhone’s settings: Just find Switcher, then Camera Guides.
We Recommend:
Always use grid lines. They’re a cheat sheet for good composition.
6. Let’s wrap this up
Believe it or not, your iPhone is your secret weapon for professional video, and if you follow this best iPhone camera settings guide, you’ll be amazed at the professional video quality you can achieve.
However, your iPhone’s native camera app will only take you so far. Even a beginner videographer will soon outgrow automatic settings, and that’s where Switcher Studio comes in. When you download the Switcher Studio multicamera software for iOS devices, you unlock your iPhone’s true professional video power! Not only do you get manual controls and high-quality recording in the app, but also custom graphics like lower thirds and premade animations. You can produce your entire video in minutes without ever having to export footage to a computer for tedious post-production editing. Switcher Studio is a flexible experience that’s simple to learn, but grows with you as your video production skills advance.
Download Switcher Studio on the App Store today or start here with a free 2-week trial before subscribing.
Subscribe to the blog
Sign up to receive notifications whenever a new blog post is published. You may unsubscribe at any time.

Share
About the Author

Dan is an Emmy Award-winning video producer who’s worked in journalism, TV news, commercial production, and brand marketing. Dan sees nearly limitless potential in Switcher Studio’s video tools and is excited to share his experience, expertise, and (sometimes "out there") ideas.
All posts by Dan Klapheke