Unless the sun temporarily blinds you when you exit a movie theater on a sunny day, light is probably something that rarely crosses your mind. But when it comes to video, lighting is everything.
Lighting affects every piece of video content you’ve ever watched — on YouTube, in a movie theater, on Facebook — but I bet you only notice lighting when it’s done poorly. (Unless you’re like this author, who’s often distracted wondering about a content creator’s lighting setup for live streaming.)
For video content creators, lighting setups are a big deal.
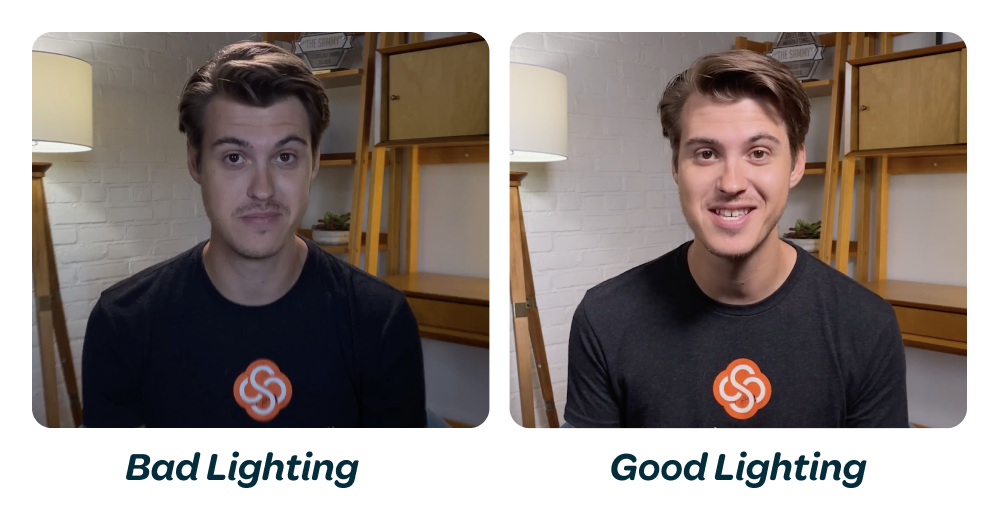
At first, lighting in video seems like a no-brainer. If you can see your subject just fine with your eyes, shouldn’t it show up just fine on video? That's until you shoot your first piece of content, and the harsh shadows and wonky color are so distracting that you, the creator, don't even want to watch it. And if you’re live streaming with a poor lighting setup, good luck keeping your audience engaged and tuned in: Your viewers will find your stream unwatchable, even if they can’t pinpoint exactly why, and end up moving on to the next video.
Thankfully, good lighting is easier to attain than you may think. So let’s go over some simple video lighting know-how and tips for the best lighting setup for live streaming video.
What is 3-point lighting?
Without a doubt, some elements of “good” lighting are subjective: You light for theme and mood in video, as well as visibility, and there are countless ways to achieve the style of lighting you want.
However, for most applications, there are hard and fast rules that ensure your video’s subject can be seen properly by your audience — simple, go-to lighting methods that professionals in film and TV return to for most video projects.
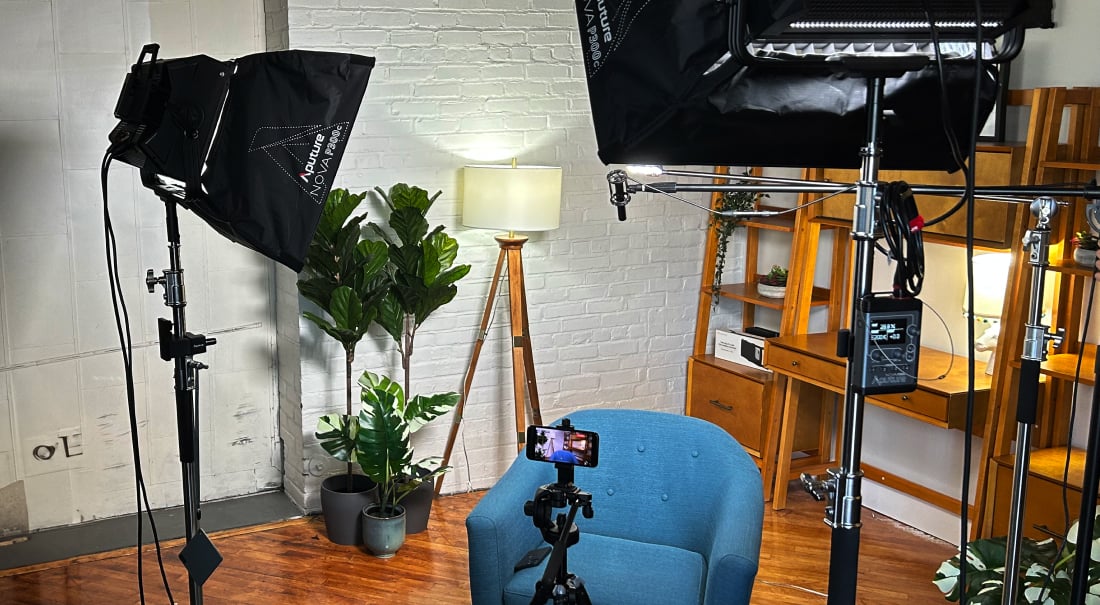
These tried and true lighting methods are a great starting place for your lighting setup for live streaming, and the most trusted lighting principle is the 3-point lighting method. I guarantee you’ve seen this approach to lighting in practice. It offers a natural, flattering, and appealing look that viewers won’t notice (other than to say, “wow, they look really nice!”).
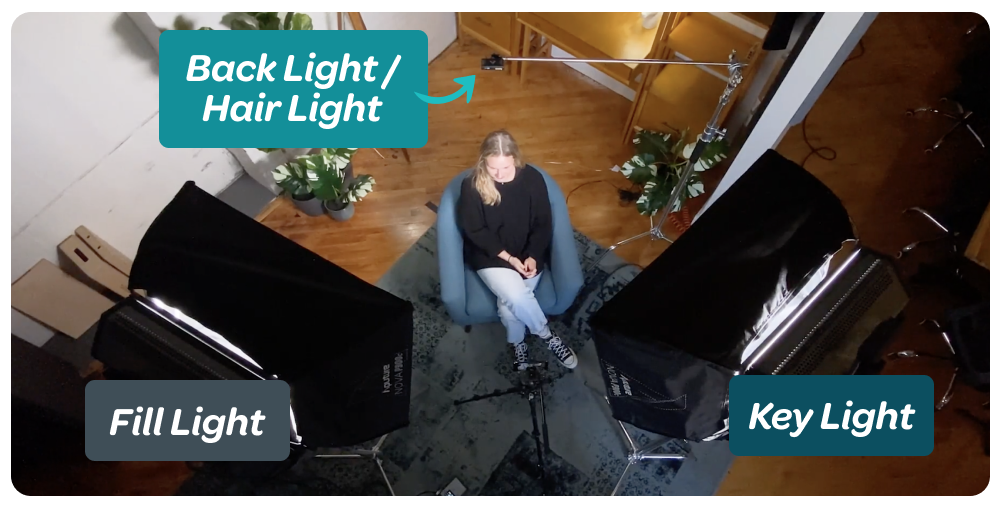
There are a few giveaways of a 3-point lighting setup. If you’re looking at a face on screen, one side will be more shadowed than the other, indicating a light source is coming from the opposite direction. You’ll also notice the subject seemingly outlined with light, clearly separating them from the background. The key to this look is the combination of the three points of the 3-point lighting method: the key light, fill light, and back light.
1. The key light
The key light is the main light source illuminating a video’s subject — you or your on-screen talent. This dominant light sets the scene for your video and is the first step in creating an appealing lighting setup.
If you only have one light to work with for your streaming setup, a key light is always the most important to have when lighting for streaming. In fact, the other two lights of the 3-point lighting method don’t make much sense without a key light.
Key light placement
Place the key light in front of the subject and just slightly to the right or left. If you place the key light directly in front of the subject, your video can start looking intense at best, or like a police interrogation at worst. If you place the key light too far to either side, half of your subject’s face will be in shadow.
Again, key light placement is subjective, and there are undoubtedly scenarios that call for these more extreme looks. But for now, go with a slightly angled key light placement that’s proven to work for most general lighting applications.
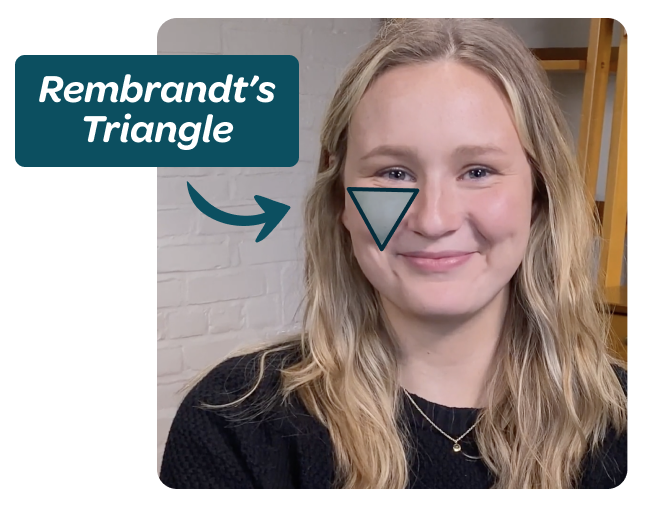
Rembrandt’s Triangle
With your key light placement, you should create a small triangle of light on the shadowed side of the subject’s face, high on the cheek just under the eye. This is known as “Rembrandt’s Triangle,” named after the painter’s style of portraits, and it’s an easy indicator for proper key light placement.
What to use for your key light
If you don’t have true video lights, your key light can be almost anything giving off enough light to illuminate your subject. A lamp, a window, the early morning or late evening sun — any of these can be used in a pinch.
2. The fill light
With your key light positioned, your subject’s face will have one well-lit side and one side in shadow. Now it’s time to address those harsh shadows, and the solution for this is a fill light.
The fill light is like a mirror of the key light, but less bright and less intense. The fill light’s purpose is simply to lighten the shadow created by the key light.
Without a fill light, the shadows cast by the key light could be nearly black, obscuring all the details of your subject’s face. A fill light brightens and brings back detail to the subject.
Fill light placement
Placing a fill light is simple, as you essentially mirror the position of the key light on the opposite side of the subject’s face. If your key light is in front and to the left, your fill light is in front and to the right.
What to use for your fill light
Like the key light, almost any light source can be used as your fill light, but the most important thing to nail down is the appropriate brightness. You don’t want the fill light so strong that it competes with your key light (which makes it hard to use the same kind of light for both the key and fill lights). If both key light and fill light have the same brightness and intensity, you’ll create even lighting.
On the other hand, if your fill light is too weak, it won’t bring back enough detail to the shadowed side of the face. Again, look for Rembrandt’s Triangle on the cheek as an indicator that the fill light is at the right brightness.
3. The back light
Finally, we have the back light, also known as the hair light. This light is arguably the least important in your 3-point lighting setup, but it can certainly enhance your video and make your content stand out.
Back light placement
As you’ve probably guessed, the back light is placed behind the subject and off-camera. It's just bright enough to create an outline of light around the subject without turning them into a heavenly, haloed figure.
You may be wondering, “but … why?” What’s the point of adding a light behind your subject if they're facing the camera? The answer is pretty interesting.
The back light creates a clear separation between the subject and the background and makes focusing on the subject much easier for your viewer.
Think about your favorite cartoon: The main character is likely outlined with a black line or another differentiating color. That outline is accomplishing something similar to a back light.
What to use for your back light
A small and more directional light works great as a back light. You could even use something as simple as a flashlight.
A note about 3-point lighting
One more thing to keep in mind when setting up your 3-point lighting: Turn off the overhead lights in the room where you’re filming. Overhead lights will interfere with your 3-point lighting setup and create unwanted shadows that overpower your carefully curated video lighting. Instead, trust your key light, fill light, and back light to do the work.
You can add lamps or other practical lights — they can actually enhance your scene — just make sure they’re not intensely bright or distracting.
Choosing lights for your 3-point lighting setup
We’ve got the basics of a good lighting setup, so now let’s talk about what kind of lights can help you accomplish this look. As is often the case with video equipment, there are almost too many options to sort through when it comes to brands and products. So instead of listing specific products, we’re going to stick to what to look for in a light. These guidelines will give you the tools you need to choose quality lights that work for you.
LED lights, the best of the best in video lighting
If you were researching professional lighting for video 20 years ago, you’d find expensive, energy-inefficient, prone-to-overheating bulbs and fresnel film lights. These lights would be cumbersome to store, operate, and set up. On top of all that … they would almost certainly be out of your budget.
LED lights changed the game for independent filmmakers. LEDs offer portable, affordable lighting options but achieve the same professional look of a Hollywood set.
And LED lights aren’t just for filmmakers — they’re great for livestreamers too. They’re often small enough to fit right on a desk or a small off-camera stand. They don’t emit as much heat as older lights, so they won’t make you or your subject sweat during your livestream or video shoot.
Lighting color temperature
Think about the last time you had to buy light bulbs. A seemingly simple errand suddenly becomes an overwhelming choice when you see rows of bulbs with labels like “soft white,” “warm white,” and numbers with K’s next to them — what happened to light bulbs just being light bulbs?
All these options have to do with lighting color temperature, and color temperature has everything to do with how your video lighting setup will look. Color temperature, measured in Kelvin (K), indicates how warm or cool a light source is. The higher the color temperature, the cooler or more blue the light will be. The lower the color temperature, the warmer or more orange a light source will be. Sunlight, for instance, sits around 5600 K, and warm household lights are around 3200 K.
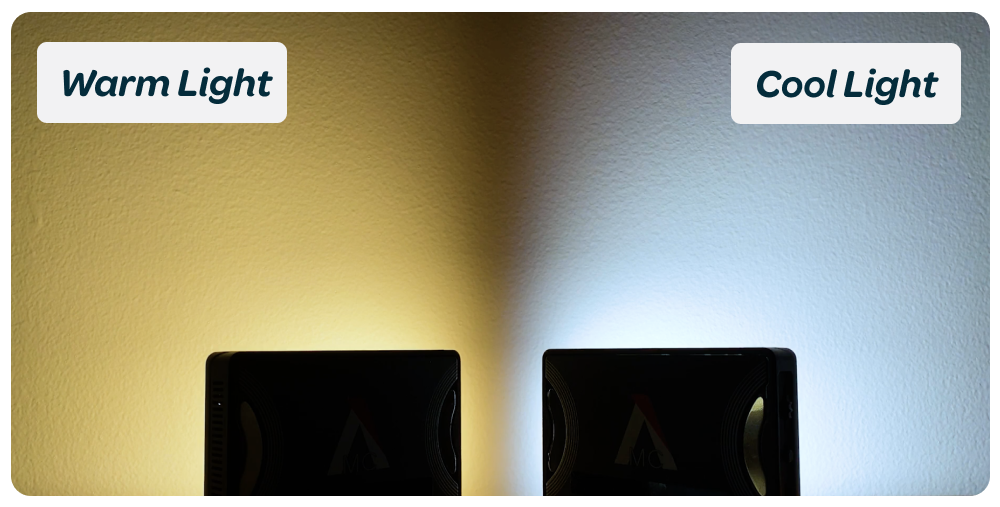
Color temperatures also come into play in the settings of the camera you’re filming with, as you want to match your camera’s white balance setting to the color temperature of the light source in the scene. For example, if your camera’s white balance is set to 3200 K but your light source is 5600 K, your scene will look overwhelmingly blue.
A great kind of light to go for is bi-color, which will let you change the color temperature of the light to a warmer and cooler setting. Better yet, a variable color temperature light will let you choose a precise color temperature that you can then match your camera’s white balance to the temperature you choose. But whether you buy a light with an adjustable color temperature or not, understanding the color temperature of your light source will ensure your live stream scene looks natural.
Light quality: hard vs. soft
Just as lights can have different colors, lights can also create different shadows. A hard light source is directional and intense, and the shadows created by it are sharp and defined. A soft light source is diffused and spread out, and the resulting shadows are gradual and less defined.
Generally, soft light is more flattering, creating more pleasant shadows and definition. It’s the go-to for many films and shows, and you’ll likely see your favorite streamers using soft, diffused light. Some lights will come with a diffusion cover, but you can also just throw a white cloth over the light to get a similar effect with a lower budget.
Ring lights
An honorable lighting equipment mention is the ring light. Ring lights have become more popular over the years with the rise of selfie-style videos and short-form video content. You’ve likely seen one (or even own one yourself) as ring lights are particularly popular for makeup and beauty content.
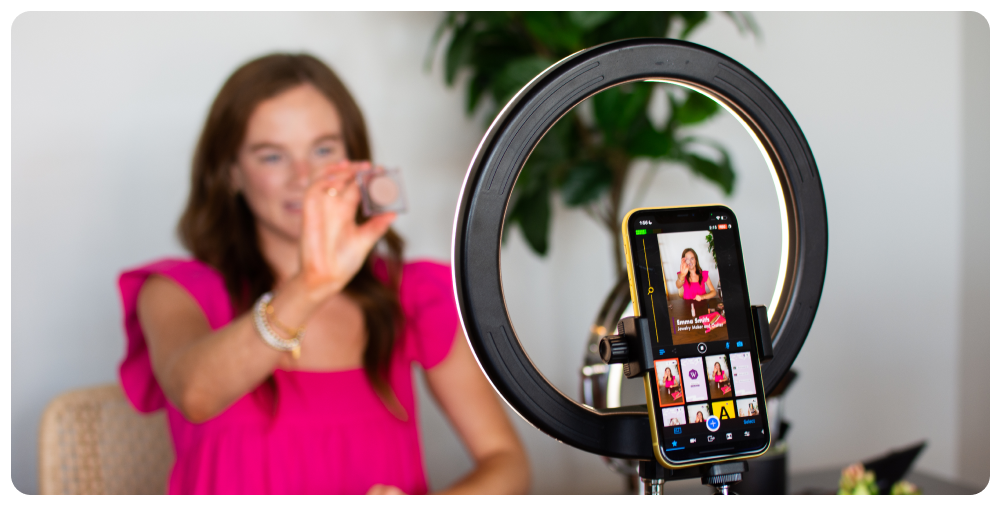
With a ring light, the camera goes in the center of a circular light that illuminates the subject head-on. Ring lights are quick to set up, simple to use, and require less fuss than a 3-point lighting setup. Consider a ring light if you need a quick and easy solution that will look the same every time.
Now, let there be light!
As mentioned, video lighting is subjective, and there’s no such thing as a perfect all-purpose lighting setup. If you’re going for a specific look that you can’t achieve with these approaches, feel free to throw them all out the window and experiment to get the look you want. However, if you don’t know where to start creating a great lighting setup for your livestreams, hopefully the principles and tips we’ve gone through help you get started.
If you have a lighting setup you’re proud of, be sure to share it with us on social @switcherstudio!
Subscribe to the blog
Sign up to receive notifications whenever a new blog post is published. You may unsubscribe at any time.

Share
About the Author

Dan is an Emmy Award-winning video producer who’s worked in journalism, TV news, commercial production, and brand marketing. Dan sees nearly limitless potential in Switcher Studio’s video tools and is excited to share his experience, expertise, and (sometimes "out there") ideas.
All posts by Dan Klapheke