To say that Amazon has revolutionized the way we shop is an understatement. I’ve bought everything from vitamins (”Subscribe & Save” for the win) to my husband’s wedding ring on Prime. Romantic, right? I can’t help it — Amazon just makes shopping so easy.
And now Amazon Live, a QVC-style livestreaming platform within their site and app, is making shopping even easier, particularly when it comes to shopping for products recommended by influencers.
Here’s why: The current process for purchasing Amazon products recommended by influencers is a little convoluted. Take my own process for instance. I recently saw a fashion blogger’s Instagram post (#amazonfinds) and thought, “I mean, I do need another oversized leopard-print sweatshirt this fall season.” So I opened the Like to Know It app to get the link. I found the influencer, scrolled her feed to find the sweatshirt pic in question, tapped it, then browsed the linked products to find and tap the right one. (Because obviously she linked her entire ensemble.) Only then did the Amazon app open to the sweatshirt product listing. It took me three apps and a bunch of taps to get to the sweatshirt, and I still had to read some reviews to get my prepurchase questions answered. Length? Fabric? Quality? Cut?

Amazon, the company that has figured out how to ship me a bed frame in two days, can no doubt figure out how to get me that sweatshirt without two other apps. And so they have, with Amazon Live. If you’re interested in getting on the Amazon Live streaming platform, I’m going to break it down in depth.
This blog post will cover:
- What Amazon Live is — and why to stream there
- Who can stream to Amazon Live
- How to become eligible for Amazon Live by joining the Amazon Influencer Program
- How to start streaming and selling on Amazon Live
- Best practices for your Amazon Live streams
- And more!
What is Amazon Live — and why sell on it?
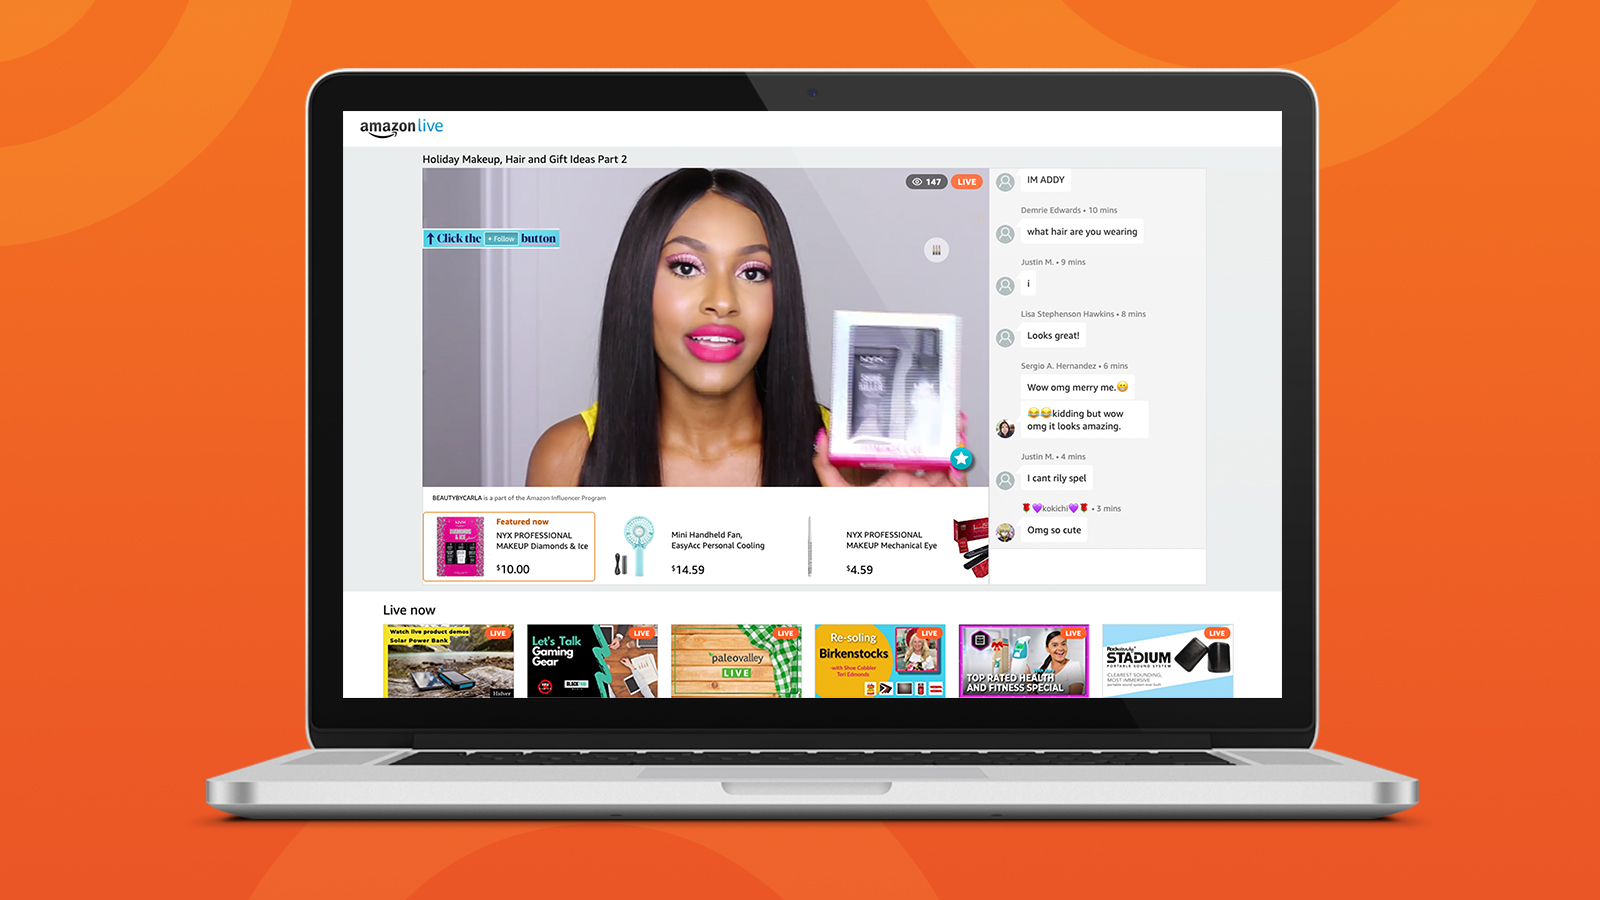
Amazon Live is a livestreaming platform that features shoppable videos highlighting products sold on Amazon. Both Amazon Sellers and Amazon Influencers can create and host streams on Amazon Live — demoing products in real time, answering questions, sharing promo codes, and selling their own products or earning commissions on others’. Beside each live video is a real-time chat window, allowing shoppers to ask questions about products and deals, and below each video is a carousel of the products shown in that stream, allowing shoppers to purchase instantly. You can access Amazon Live from both the Amazon app (main menu > See All Programs > Amazon Live) and the Amazon website at Amazon.com/live.
 The types of products demoed on Amazon Live extend far beyond my beloved oversized sweatshirts. As I write this, the above-the-fold stream on Amazon Live is about tech deals — tablets, monitors, and laptops. And below the fold are sporting goods streams, makeup and nail tutorials, kitchenware cooking demos, and pet and baby gear videos. These streams blend the Home Shopping Network format with that of YouTube or Instagram reviews, and they’re designed to sell, which is why the Amazon Live platform is a must for influencers.
So if you want to make money livestreaming, promoting products on Amazon Live is for you. Here are a few more reasons why you should stream while the iron is hot:
- Livestream shopping has already taken off in China, where it generated $60+ billion in 2019, according to Glossy. Experts only expect the livestream trend to spread.
- Amazon is the biggest online retailer in the world with $200+ billion in revenue and a $1.4 trillion market value, which means Amazon Live shopping could quickly become huge.
- Influencers earn a commission for each product they sell through Amazon Live, unlike products they sell with Instagram’s new shoppable features, through which only brands make money. Amazon commissions can range from 1% for categories like grocery to 10% for categories like luxury beauty, with most categories in the 2-5% range.
- Those who’ve tried it recommend it. Amazon Live influencer Carla Stevenné told Modern Retail, “I would suggest any influencer who’s serious about influencing, who really wants to grow a big audience, you want to start now.”
The potential of Amazon Live is HUGE, and it’s not too late to be among the first early-adopter influencers on the platform.
How to become eligible for Amazon Live
Not just anyone can stream to Amazon Live, but requesting access isn’t too tricky. Here’s who can access the platform according to Amazon Live’s FAQs:
- Amazon Influencers in the Amazon Influencer Program
- Amazon Sellers
- Amazon Vendors
Whereas Amazon Sellers sell directly to Amazon customers, Amazon Vendors sell their products to Amazon, which then resells those products to customers. So if you’re not selling your own products in one way or another, the way to stream on Amazon is through the Amazon Influencer Program.
The Amazon Influencer Program, which launched in 2017 and grew out of the Amazon Affiliate Program, enables influencers not only to earn a commission on followers’ purchases but also set up their own Amazon storefronts on which they can promote their favorite products.
How to join the Amazon Influencer Program
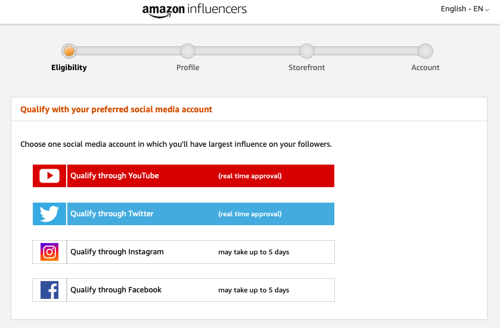
Applying for the Amazon Influencer Program is quick and easy. I applied using Switcher’s Instagram account and was approved within a few days. You can apply using your YouTube, Facebook, Twitter, or Instagram account. Whereas YouTube and Twitter applications can be approved in real time, Instagram and Facebook applications may take up to five days to be approved.
Even if it means waiting a little longer, be sure to apply with the account on which you have best balance of followers and engagement. You may get approved even if you have a small following — unlike some other platforms, Amazon is open to micro-influencers that have small followings but strong engagement.
- Get started: Visit the Amazon Influencer Program page and click Get Started.
- Create an account: Choose whether to associate an existing Amazon account with your new influencer account or to create a new Amazon account.
- Apply with your socials: Choose which social media account you’d like to use to apply for eligibility.
 Wait for acceptance: Depending on which social account you applied with, you may have to wait a few days to hear back about whether you’ve been approved. (In the meantime, you can still build your storefront.)
- Flesh out your profile: Create your profile, adding a photo, your name, description, and social links.
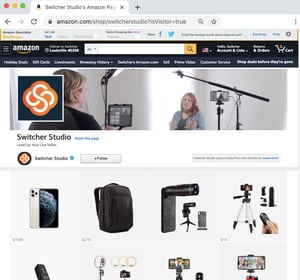
- Set up your storefront: Make your storefront enticing by adding shoppable photos (á la Like to Know It) or lists of your favorite products.
How to livestream to Amazon Live
Once you’ve been approved as an Amazon Influencer (you’ll find out via email) and you have your storefront set up, it’s time to start streaming and selling on Amazon Live. For this you’ll need to download the Amazon Live Creator app from the App Store — the app is currently available only for iOS devices.
What is the Amazon Live Creator app?
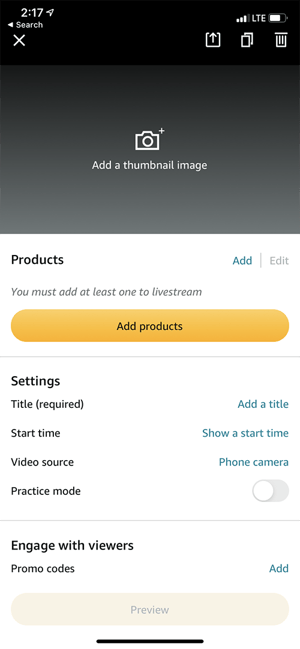
The Amazon Live Creator app is your hub for starting and managing your streams on Amazon Live. It’s where you title and schedule a stream, add the products you’re featuring, choose a video source for your stream (more on that in a minute), and add promo codes. You can also see analytics about your sales, earnings, followers, views, and more. And best of all, it has a practice mode feature, so you can do a test stream before you ever go live for the world to see.
How to use the Amazon Live Creator app to sell on Amazon Live
 Log in: Launch the Amazon Live Creator app and log in.
- Create a stream: Tap the “+” button to create a stream. You’ll be taken to the stream setup page.
- Add a thumbnail: Tap the camera icon to add a thumbnail image for your stream. Unless you stream in practice mode, this thumbnail will show up on your storefront before and after your stream (and, as you gain cred, it may show up on the Amazon Live homepage).
- Add products: Tap Add products to select the Amazon products you’ll be discussing in your stream. You can find these products using the search bar or by choosing a product list that you’ve already added to your storefront. These will be displayed below your video during your stream.
- Add details: Tap each field to add a title (required), a start time (optional), and any promo codes (optional).
- Turn on practice mode (or don’t): Toggle Practice mode on if you’d like to practice before going live.
- Share your link: If you’re not in practice mode, tap Share a link to your livestream. If you’re in practice mode, tap Get practice mode link instead. Both options launch the iOS Share Sheet so you can share your upcoming practice or public stream URL in nearly any app.
- Choose your video source: Tap Phone camera to choose your video source — either a phone camera or an external camera. (An external camera requires slightly more in the way of setup but yields a much more professional livestream. I’ll cover how to use an external camera in a minute.)
- Preview your stream: Tap Preview. You’ll be taken to another page of the app where you’ll get to preview and start your video.
- Go live: After your stream initializes, tap the pink Go Live button to start your broadcast! (If you’re in practice mode, it will be a pink Practice Now button.) You’re now streaming.
- Highlight products: Tap product listings at the bottom of your screen to show viewers which products you’re discussing at each moment.
- Chat with viewers: Use the chat window below your product listings to respond to viewers in the chat — or simply respond to them live in your video!
- End your stream: When you’re finished, tap the pink End button in the top right.
How to use an external camera in the Amazon Live Creator app
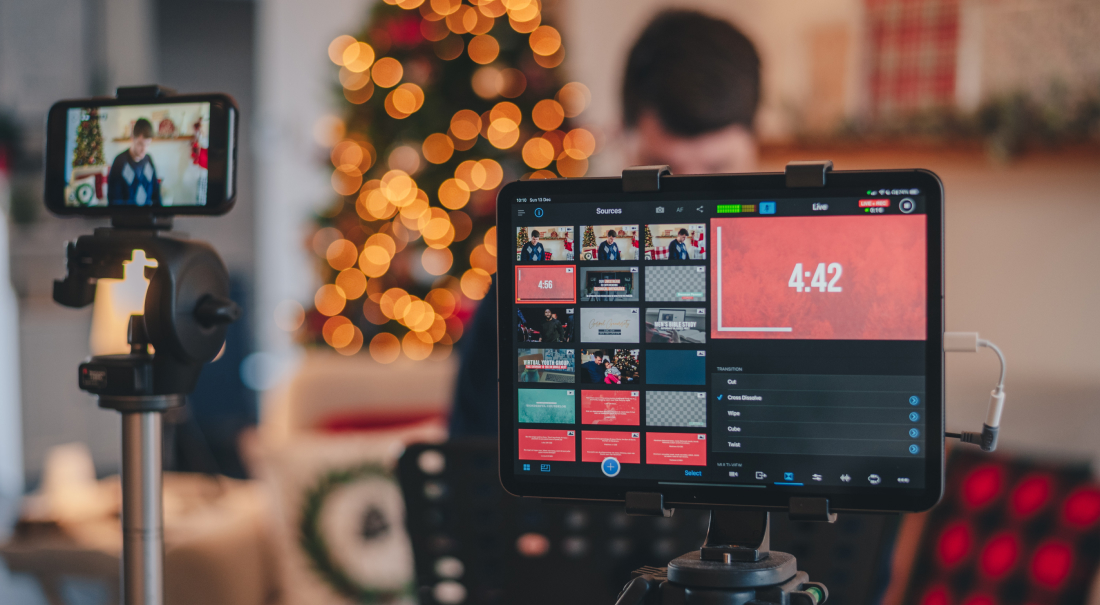
If you check out the Amazon Live homepage, you’ll notice that none of the featured influencer streams appear to have been created with just a single phone as the video source. These influencers have all chosen the external camera option within the Amazon Live Creator video setup. You can tell because their streams feature text overlays, multiple camera angles, prerecorded openers, logos and other on-screen graphics, and even screensharing of actual Amazon listings. All of these additions create a way more dynamic feel than what you can get with a single phone camera.
And, thankfully, you don’t need expensive camera gear or a broadcasting degree to create these types of videos for your own Amazon Live videos. You just need a couple of iOS devices and some simple but professional livestreaming software, a.k.a. Switcher Studio. Here’s how to connect Switcher to Amazon Live Creator. I’ve linked a few more in-depth tutorials below.
Grab some iOS devices
You need one iOS device to run Switcher Studio (which I’ll call device 1) and one iOS device to run Amazon Live Creator (device 2). Switcher actually lets you connect up to nine iOS device cameras to create multicamera streams, so you can eventually incorporate as many as you want!
Download Switcher Studio
On device 1, create your free Switcher Studio trial and download the Switcher app, logging in with the credentials you just used to create your Switcher trial.
Choose an external camera source in Amazon Live Creator
On device 2, launch the Amazon Live Creator app and follow steps 1-8 above. I recommend doing this in practice mode. When choosing your video source, choose External camera. A Get URL and stream key button will be revealed — tap it, then send your stream credentials to yourself for easy access from a computer.
Create an Amazon Live channel in Switcher Studio
On your computer, visit the Switcher Studio Dashboard’s custom RTMP setup page, then tap +Add Channel. (It’s also possible to set up an RTMP channel within the Switcher app if you’d rather not use a computer.) Nickname your channel “Amazon Live.” Enter the stream credentials — the server URL and stream key that you just sent yourself from Amazon Live Creator — into the corresponding fields. Next, match your stream quality to Amazon’s recommended bit rate by clicking Manual Configuration and choosing a Video bit rate of 2800 Kbps.
 Connect Switcher Studio with Amazon Live Creator
On device 1, open the Switcher app if needed and tap Use as Switcher. Visit the Outputs tab and tap Custom RTMP: Amazon Live on the list of broadcasting platforms. (This is the new channel you just set up.) When you’re ready to stream, tap the big red button in Switcher.
On device 2, you’ll see that Amazon Live Creator recognizes that your Switcher stream has started. Tap Go Live in ALC. Now you are streaming to Amazon Live with the video you’re creating in Switcher Studio! When you’re done streaming, tap End in ALC, and then tap the stop button in Switcher.
Best practices for creating amazing Amazon Live streams
Woot! You’re now on the path to selling on Amazon Live with stunning streams. Connecting Switcher Studio to Amazon Live Creator is just the beginning of upping your streaming game. You can now use Switcher to connect multiple iOS camera angles, roll in openers for your shows, add text, bring in guests, and more. Here are our top tips for creating engaging streams:
- Design an enticing thumbnail: Before you schedule or start a stream, design a thumbnail that will help your Amazon Live video stand out among the rest. For the greatest impact, include a photo of yourself, a photo of one or two of the products you’re going to be discussing, and some text describing your stream.
- Use reliable Wi-Fi: For best results, don’t rely on your data plan for an Amazon stream — use a Wi-Fi network with at least 4 Mbps upload speed. (Check yours at speedtest.net.)
- Go into airplane mode: A phone call will interrupt your stream, so put all your devices in airplane mode before you go live.
- Showcase reviews: One of Amazon’s selling assets is its wealth of user reviews, which help buyers make educated decisions. Try showcasing reviews of the products you’re featuring. Simply pull up the reviews on your computer or iOS device and screenshare them right into your stream using Switcher Cast.
- Grow your followers: This is an influencer platform after all. Encourage Amazon Live viewers to follow you by tapping the +Follow button on your streams, and tout your Amazon storefront on your other social media accounts to capitalize on your existing audiences.
- Share your streams: Similarly, share your Amazon Live stream links on your other platforms before you go live. Let people know that you’re going to be live and tell them what you’ll be reviewing.
- Keep traffic on Amazon: Though you can drive people from other platforms to Amazon, don’t drive people from Amazon to other platforms. This is frowned upon by Amazon and can result in your streams being taken down.
- Add multiple angles: Amazon Live videos tend to be lengthy — typically 1-2 hours. Keep things interesting by connecting multiple iOS cameras and streaming from multiple angles. Use these angles to highlight the products you’re discussing. If you’re doing a nail polish review, you’ll want an angle on your hands and an angle on your face. If you’re doing an exercise gear demo, you’ll want a wide angle on your setup and a close-up on your face.
- Include an opener: Start your streams with prerecorded opener/countdown videos. This not only gives viewers a chance to hop on but also provides a way for you to brand your streams with recognizable openers.
- Use text overlays: Introduce stream segments, display product names, share promo codes, or even pause your video with simple text and title overlays. Lots of fashion streamers, for instance, put up text overlays when they step away to swap outfits. This lets viewers know they’ll be right back.
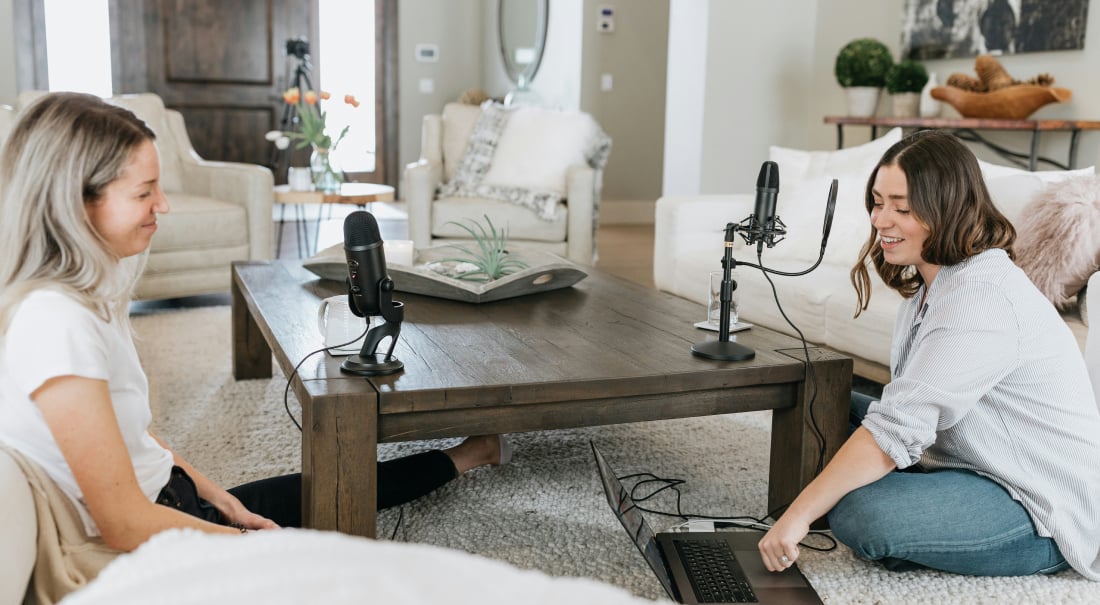
- Invite a co-host: Collaborate with friends or fellow influencers by inviting guest co-hosts onto your Amazon Live stream. When you’re streaming with Switcher, guests can join from nearly any device and any location. For years, part of QVC’s method of selling has been product discussion among hosts — bring that same conversational format to your show.
Start earning on Amazon Live
Now it’s time for you to start streaming and earning on Amazon! If you haven’t yet done so, check out our Live Selling page, and don’t forget to start a free trial of Switcher Studio so you can create professional livestreams that help drive sales on the Amazon Live platform. And if you happen to review any oversized sweatshirts perfect for fall, be sure to let me know.
Subscribe to the blog
Sign up to receive notifications whenever a new blog post is published. You may unsubscribe at any time.

Share
About the Author

As Switcher's content strategy manager, Kate strives to answer the questions of new and expert livestreamers alike. She has spent her career in digital marketing and content strategy and now funnels that experience into helping others plan and create their own video content.
All posts by Kate Brannen Smith